A new technical blog named TechShadez has been launched. The Blog gives latest Technical News, Product reviews , security news and information about new software and hardware products.The blog can be accessed from this url http://techshadez.ishadez.com
Thursday, April 30, 2009
Wednesday, October 18, 2006
Shared Members
Visual Basic.NET introduces the concept of shared members. Shared members are a way of creating a member (a property, procedure, or field) that is shared among all instances of a class. For example, you could create a property for a database connection string. This will be the same for each class, so you can fill it in for one class and all classes can then see that one property. Shared properties are most often used in inheritance, so that all objects created from derived classes can share the same member across all instances of the class. However, shared members can be used without regard to inheritance.
Imagine that you have an data file or other mechanism for the student data listed earlier, and you want to define a method to be able to find a student, given his name, and return the student object. Rather than the COM model of having a factory to create the object, you could add the Find functionality as a shared method to the student class.
For example:
Public Class Student
Inherits Person
Public Shared Function Find(ByVal studentName As String) _
As Student
Dim Student As New Student()
Dim xmlobj As Xml.XmlElement
‘get the xml object
‘fill in the mName field
‘fill in the mAddress field
Return Student
End Function
End Class
Shared methods are commonly used in the runtime for this ability to create a specific instance of an object, for example System.IO.CreateDirectory() that will create a directory in the file system, and return a DirectoryInfo object. The same System.IO. Directory class also provides a shared method, Move, to rename a directory.
Sunday, October 15, 2006
Inheritance in VB.NET
Sell and Buy Used Book - Bukz4u.com
What Is Inheritance?
Inheritance is a very powerful form of code reuse. With inheritance, you write one class that contains some properties and methods. That class becomes the basis for other classes, and is known as the base class. Classes that then use this base class are known as derived classes. Most often, the derived classes extend the functionality of the base class.
Inheritance is the mechanism which allows class A to inherit properties of class B. We say “A inherits from B”. Thus, objects of class A have access to attributes and methods of class B without the need to redefine them. The following definition defines two terms with which we are able to refer to participating classes when they use inheritance.
Superclass/Subclass
If class A inherits from class B, then B is called a superclass of A. A is called a subclass of B. Objects of a subclass can be used where objects of the corresponding superclass are expected. This is due to the fact that objects of the subclass share the same behavior as objects of the superclass.
Implementing Inhertance In VB.NET
When we say inheritance in Visual Basic .NET, we mean that a child gets a copy of everything found in a parent plus anything we add to that child. Technically, a child gets a copy of the data and access to a methods table, but for simplicity we think of child classes as getting their own copy of everything. This does not mean that a child can directly access every member inherited from the parent; access rules still apply. The child gets a copy of everything, but can only directly access public, protected, and friend members of a parent. Because private members represent implementation details, a child class is usually interacting with private members indirectly via public, protected, or friend members.
Basic Inheritance Statement
Fortunately the grammatical complexity of inheritance relationships is miniscule. Given two classes, one playing parent and the other child, all you need to do is add a single statement to indicate inheritance
The simplest inheritance relationship.
Public Class Parent
End Class
Public Class Child
Inherits Parent
End Class
From the above code you can see that Inherits Parent is all that we use to indicate inheritance of child from parent. The grammar is the easy part. Choosing what to expose in a parent and what to add to a child is the very subjective part of object-oriented programming that trips some programmers up.
Basic guidelines for Inheritance
Make methods protected and virtual unless you are reasonably sure they should not be.
When defining reference parameters, define parameters to be parents reasonably high up in the architecture. You can always pass an instance of a child and typecast the parameter.
When you have a class that works and needs new behavior, create a child class and add the behavior to the child. You will not break existing code by modifying an existing class. You will have the old and new behavior and two classes to draw from.
Keep methods and property methods very short and singular.
Inheritance Example
Create a new VB.NET Windows Application project and name it InheritanceTest. Add a button to the form and go to the code window. In the code, add the following class. Make sure that you add it outside the class for the form
Public Class Person
Dim localName, localAddress As String
Property Name() As String
Get
Name = localName
End Get
Set(ByVal Value As String)
localName = Value
End Set
End Property
Property Address() As String
Get
Address = localAddress
End Get
Set(ByVal Value As String)
localAddress = Value
End Set
End Property
Public Function Enroll() As Boolean
'code to check class enrollment , if enrollment Enroll = True
End Function
End Class
This code creates a Person class with two properties, Name and Address, and an Enroll method.
Now, add a second class, called Student. Your code should look like this:
Public Class Student
Inherits Person
End Class
There isn’t any implementation code in Student at all. There are no properties or methods defined. Instead, all you do is inherit from Person.
Now, in the Button1_Click event handler on the form, add the following code:
Dim Student As New Student()
MsgBox(Student.Enroll)
Your form is creating an instance of the Student class. The only code in the Student class is an Inherits statement that inherits the Person class. Since VB.NET supports inheritance, you’ll be able to call the Enroll method of the Person class from within the Student class, even though the Person class does not explicitly define an Enroll method. Instead, the Enroll method is present because Student is inheriting the method from Person.
Post your comments....
Next Blog on how to prevent and force inheritance...
Saturday, October 14, 2006
Exception−Handling Tips
Structured exception handling is very important, but you should not overuse it. Here are some important tips to make sure you do not:
- Avoid using Visual Basic exception handling for anything other than handling errors. Often,developers will find that TryCatchFinally blocks make for interesting flow−control structures, but using them for this purpose only serves to damage the structural integrity of the program and consume resources.
- Creating custom exception classes for every error you might encounter doesn't make sense. Creating equivalents of the run−time exception classes only wastes time and resources.
- Notwithstanding the usefulness of the Throw feature, you should handle exceptions, as far as possible, in the method in which they were raised. This, too, conserves resources and makes your code easier to follow.
- When using nested Try blocks or multiple Catch blocks, you need to remember to place the default Catch E As Exception as the last Catch block, because placing it earlier will prevent any later exception classes (both custom or built−in) from ever getting executed.
- Handle all exceptions; do not simply catch exceptions and then do nothing with them. Providing "sterile" exception−handling code does not mean you do not have to deal with the exceptions, and they should not merely be "swept under the carpet."
Error Handiling in VB.NET
Sell and Buy Used Book - Bukz4u.com
Error handiling in VB.NET is done using error handling structure called Try...Catch...Finally, old versions like vb6 uses On Error Goto structure for error handiling.
The overall structure of the Try...Catch...Finally syntax is to put the code that might cause an error in the Try portion,and then catch the error. Inside the Catch portion, you handle the error. The Finally portion runs code that happens after the Catch statements are done, regardless of whether or not there was an error.
Example:
Dim x, y As Integer
x=2
y=0
Try
x \= y
Catch ex As Exception
msgbox(ex.Message)
End Try
Tip:: ex As Exception part of the Catch statement is optional.
In the above code you have two variables of type integers. You attempted to divide x by y, but because y has value set to 0. That division by zero raises an error, and you catch it in the next line. The variable ex is of type Exception, which holds the error that just occurred, so you simply print the Message property.
Friday, October 13, 2006
starting programming with vb.net
First Program :"Hello World"
To create our program, we must first open a new project, we can do this by clicking on the File menu option, then selecting new, then project. This will bring up a form asking you what kind of project you would like to create. For this project, we would like to make a Windows Application in VB.Net. Select the folder called Visual Basic Projects, and select Windows application. For this project, we will be calling our program "Hello World." Select where you would like to place the program that you will create.

Now it is time for a basic tour around the screen. You will see a pretty familiar menu system on the top of the screen. Don't be fooled , there are some very powerful wizards enclosed in these menus, wizards that can save you hours of hard coding. You will also see a toolbar on either side of the screen (depends on setup and layout). You should also see a property bar to either side of the screen.

After you feel a little more familiar with the screen, we can start creating our new program.From the toolbar, select windows forms, if it hasn't already been selected by default. From this menu you can select many different objects that you can add to your program. Scroll down the bar until you come to the RichTextBox object. Click it. Now if you move your mouse over to the form (it should have the name of Form1 on it) you will notice that the mouse cursor has changed. Now like almost any windows application, just drag and draw the object. If you make the object too small, that's okay, because you can resize the image easily by dragging one of the white squares on the outside of the image. After you have drawn (or added an object) you will see the object created in your form. Now it is time to use the properties bar. Select the TEXT option in the properties bar and change the text from RichTextBox1 to Hello World. Click the form and you will see that the text inside the RichTextBox object has changed to Hello World. Now we can also do this with the form. Click the form, or select Form1 from the dropdown box on the property bar, and change the text property to Hello World.
Now we have a great looking project but it doesn't do anything. Lets add a few buttons to add some functionality to our project. Once again, go to the Toolbox bar. This time select Button from the options. Draw the button onto the form, and then repeat the process until you have drawn three buttons on to your form. Once you have completed drawing the buttons, change the texts on all three buttons. Change button1's text to Clear. Change button2's text to Hello World. And change button3's text to Color. Now that you have completed that, we can start coding. Double click the Clear button. When you double click any object in a project, it will bring up the coding screen.
Coding screen will look like this
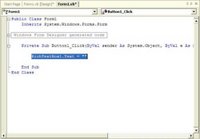
Enter the following code into the program:
RichTextBox1.Text = ""
Everything in VB.NET is an object of some sort, and RichTextBox1 is no different.To access any property associated with RichTextBox1, all you must do is call it by name, add a "." (dot or period) and then call its property by name, as is illustrated in the example above.
Let us examine the code a little closer. The object RichTextBox1 can be referenced by calling it by name, along with any one of its properties. When we have changed the RichTextBox1 text property before to Hello World, we set its initial property value. The code attached to the event of clicking button with text "clear" (Button1_Click) changes the initial RichTextBox1 text property from Hello World to nothing. To test your code, click the play button (the triangle on the menu bar). After a few moments, your form will appear. Click the Clear button and notice that the text in the RichTextBox1 object disappears. Close your program, and return to the design screen. We will now add code to the other two buttons. Double click the Hello World Button, and access the coding screen. Enter the following code into the program:
RichTextBox1.Text = "Hello World"
This will add the words Hello World back into the RichTextBox1 object. Once again, we are accessing the RichTextBox1 object by calling it by name. We are also access the RichTextBox1 text property in the same way as we did with the Clear button code.
Click back to the Design screen and double click on the Color button. The code for this button is similar to the other button's code, but we will be accessing another class other than the RichTextBox1. Lets examine the code that will go into this button:
RichTextBox1.SelectionColor = Color.green
As you can see, we have called RichTextBox1 again, but this time we have accessed its SelectionColor property. This property changes (or returns) the color of selected text within the parent object (here it is RichTextBox1). The difference in this code from the others is that we are setting the property to a value from another class, other than a value (or empty value) that we code. Color in this case is a class. On of its properties is green. So you can see that we are going to set the Selected color in the RichTextBox1 to green. Say we wanted to change the color to blue instead of green, in that case we would set the RichTextBox1.SelectionColor = Color.Blue.
Wednesday, October 11, 2006
Visual Basic.Net Versions
Visual Basic .NET
Visual Basic 2005
Visual Basic 2005 is the next iteration of Visual Basic .NET, Microsoft having decided to drop the .NET portion of the title.
For this release, Microsoft added many features in an attempt to reintroduce some of the ease of use that Visual Basic is famous for — or infamous, with respect to "newbie" programmers — including:
The above functions (particularly My) are intended to reinforce Visual Basic .NET's focus as a rapid application development platform and further differentiate it from C#.
The original Visual Basic .NET was released in 2002. C# , which was released alongside with viual basic.net received the lion's share of media attention, while VB.NET (also known as VB7) was not widely covered. As a result, few outside the Visual Basic community paid much attention to it.
Those that did try the first version found a powerful but very different language under the hood, with disadvantages in some areas, including a runtime that was ten times as large to package as the VB6 runtime and an increased memory footprint.
Visual Basic .NET 2003Visual Basic .NET 2003 was released with version 1.1 of the .NET Framework. New features included support for the .NET Compact Framework and a better VB upgrade wizard. Improvements were also made to the performance and reliability of the .NET IDE (particularly the background compiler) and runtime.
In addition, Visual Basic .NET 2003 was also available in the Visual Studio .NET 2003 Academic Edition (VS03AE). VS03AE is distributed to a certain number of scholars from each country for free.
In addition, Visual Basic .NET 2003 was also available in the Visual Studio .NET 2003 Academic Edition (VS03AE). VS03AE is distributed to a certain number of scholars from each country for free.
Visual Basic 2005
Visual Basic 2005 is the next iteration of Visual Basic .NET, Microsoft having decided to drop the .NET portion of the title.
For this release, Microsoft added many features in an attempt to reintroduce some of the ease of use that Visual Basic is famous for — or infamous, with respect to "newbie" programmers — including:
- Edit and Continue - probably the biggest "missing feature" from Visual Basic, allowing the modification of code and immediate resumption of execution
- Design-time expression evaluation
- The My pseudo-namespace (overview, details), which provides:
- easy access to certain areas of the .NET Framework that otherwise require significant code to access dynamically-generated classes (notably My.Forms)
- Improvements to the VB-to-VB.NET converter
- The Using keyword, simplifying the use of objects that require the Dispose pattern to free resources
- Just My Code, which hides boilerplate code written by the Visual Studio .NET IDE
- Data Source binding, easing database client/server development
The above functions (particularly My) are intended to reinforce Visual Basic .NET's focus as a rapid application development platform and further differentiate it from C#.
Visual Basic.net
Visual Basic.NET is the most recent generation of Visual Basic. Developers will be pleased to note that its new features include inheritance, method overloading, structured exception handling, and more. These capabilities make it easier than ever to create .NET applications, including Windows applications, web services, and web applications. The articles in this section give you all the tips you need to work wit this useful language.
Visual Basic .NET (VB.NET) is an object-oriented computer language that can be viewed as an evolution of Microsoft's Visual Basic (VB) implemented on the Microsoft .NET framework. Its introduction has been controversial, as significant changes were made that broke backward compatibility with VB and caused a rift within the developer community.
The great majority of VB.NET developers use Visual Studio .NET as their integrated development environment (IDE). SharpDevelop provides an open-source alternative IDE.
Sell and Buy Used Book - Bukz4u.com
Subscribe to:
Posts (Atom)


