First Program :"Hello World"
To create our program, we must first open a new project, we can do this by clicking on the File menu option, then selecting new, then project. This will bring up a form asking you what kind of project you would like to create. For this project, we would like to make a Windows Application in VB.Net. Select the folder called Visual Basic Projects, and select Windows application. For this project, we will be calling our program "Hello World." Select where you would like to place the program that you will create.

Now it is time for a basic tour around the screen. You will see a pretty familiar menu system on the top of the screen. Don't be fooled , there are some very powerful wizards enclosed in these menus, wizards that can save you hours of hard coding. You will also see a toolbar on either side of the screen (depends on setup and layout). You should also see a property bar to either side of the screen.

After you feel a little more familiar with the screen, we can start creating our new program.From the toolbar, select windows forms, if it hasn't already been selected by default. From this menu you can select many different objects that you can add to your program. Scroll down the bar until you come to the RichTextBox object. Click it. Now if you move your mouse over to the form (it should have the name of Form1 on it) you will notice that the mouse cursor has changed. Now like almost any windows application, just drag and draw the object. If you make the object too small, that's okay, because you can resize the image easily by dragging one of the white squares on the outside of the image. After you have drawn (or added an object) you will see the object created in your form. Now it is time to use the properties bar. Select the TEXT option in the properties bar and change the text from RichTextBox1 to Hello World. Click the form and you will see that the text inside the RichTextBox object has changed to Hello World. Now we can also do this with the form. Click the form, or select Form1 from the dropdown box on the property bar, and change the text property to Hello World.
Now we have a great looking project but it doesn't do anything. Lets add a few buttons to add some functionality to our project. Once again, go to the Toolbox bar. This time select Button from the options. Draw the button onto the form, and then repeat the process until you have drawn three buttons on to your form. Once you have completed drawing the buttons, change the texts on all three buttons. Change button1's text to Clear. Change button2's text to Hello World. And change button3's text to Color. Now that you have completed that, we can start coding. Double click the Clear button. When you double click any object in a project, it will bring up the coding screen.
Coding screen will look like this
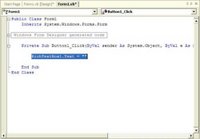
Enter the following code into the program:
RichTextBox1.Text = ""
Everything in VB.NET is an object of some sort, and RichTextBox1 is no different.To access any property associated with RichTextBox1, all you must do is call it by name, add a "." (dot or period) and then call its property by name, as is illustrated in the example above.
Let us examine the code a little closer. The object RichTextBox1 can be referenced by calling it by name, along with any one of its properties. When we have changed the RichTextBox1 text property before to Hello World, we set its initial property value. The code attached to the event of clicking button with text "clear" (Button1_Click) changes the initial RichTextBox1 text property from Hello World to nothing. To test your code, click the play button (the triangle on the menu bar). After a few moments, your form will appear. Click the Clear button and notice that the text in the RichTextBox1 object disappears. Close your program, and return to the design screen. We will now add code to the other two buttons. Double click the Hello World Button, and access the coding screen. Enter the following code into the program:
RichTextBox1.Text = "Hello World"
This will add the words Hello World back into the RichTextBox1 object. Once again, we are accessing the RichTextBox1 object by calling it by name. We are also access the RichTextBox1 text property in the same way as we did with the Clear button code.
Click back to the Design screen and double click on the Color button. The code for this button is similar to the other button's code, but we will be accessing another class other than the RichTextBox1. Lets examine the code that will go into this button:
RichTextBox1.SelectionColor = Color.green
As you can see, we have called RichTextBox1 again, but this time we have accessed its SelectionColor property. This property changes (or returns) the color of selected text within the parent object (here it is RichTextBox1). The difference in this code from the others is that we are setting the property to a value from another class, other than a value (or empty value) that we code. Color in this case is a class. On of its properties is green. So you can see that we are going to set the Selected color in the RichTextBox1 to green. Say we wanted to change the color to blue instead of green, in that case we would set the RichTextBox1.SelectionColor = Color.Blue.


